这是vue.js设计与实现相关文章的最后一篇,《Vue.js设计与实现》这本书的学习在上一篇的编译器相关内容中已经结束了,不过既然都已经到了编译器了,自然想尝试完善一下在学习过程中自己实现的编译器代码,其中还有很多场景的vue内容没有了解到或者实现,例如v-if、v-for指令、单文件组件(SFC)本身的编译、结合rollup插件编译自定义的文件格式等等,所以还是想尝试一下看如何去实现。所以这一篇文章就记录一下自身在阅读完《Vue.js设计与实现》这么本书之后尝试的一些小功能实现。
自定义的文件格式 相关代码参考:github:vue-design
为了和vue的单文件组件(.vue结尾的文件)进行区分,我们可以定义一个自己的单文件组件格式,例如以.vum来区分,只不过其文件的内容和语法格式和.vue文件完全一致,这样方便验证我们的编译器的功能是否符合我们的预期。
为了让编辑器,例如webstorm识别我们新增加的.vum格式文件,我们可以在其设置里面的File Types配置中,将文件后缀添加到Vue template中去。
上面的步骤,只不过仅仅是让webstorm能够识别这个文件而已,对于整个项目来说(这里用的vite创建了一个简单的vue3项目),其本身的工具链是无法识别这个.vum文件是什么东西的,而我们知道,vue的单文件组件的内容最终会被编译为js代码,所以,我们需要让vite能够识别和处理我们定义的这个.vum文件,为此,我们需要编写一个自定义的rollup插件来处理.vum文件,将其最终也转换成js代码。
简易的rollup插件编写 由于之前我也没有怎么接触过rollup插件的编写,所以,这里仅实现了一个比较简陋的rollup插件。插件的内容非常简单:
1
2
3
4
5
6
7
8
9
10
11
12
13
14
15
16
17
18
19
20
21
22
23
24
25
26
27
28
29
30
31
32
33
34
35
36
37
38
39
40
41
42
43
44
45
46
47
48
49
50
51
52
53
54
55
56
57
58
59
import { compile } from '../../src/design/compiler/compiler-4.ts' import { basename } from 'path' import {compilerScript} from "../../src/design/compiler/compilerScript.ts" ;const name = 'rollup-plugin-vum' function transformVUM (code: string , name: string ) const scriptReg = /<script(\s+[^>]*?)?>([\s\S]*?)<\/script>/gm s; const templateReg = /<template(\s+[^>]*?)?>([\s\S]*?)<\/template>/gm s; const scriptMatch = scriptReg.exec(code) const templateMatch = templateReg.exec(code) const scriptContent = scriptMatch ? scriptMatch[2 ].trim() : '' const templateContent = templateMatch ? templateMatch[2 ].trim() : '' const compilerScriptContext = { name, } const setupResult = compilerScript(scriptContent, compilerScriptContext) const compileCode = compile(templateContent, { bindingMetadata: setupResult.bindingMetadata, }) return ` ${setupResult.code} import { h, _toDisplayString, _createCommentVNode, _createTextVNode, _renderList } from '@/design/renderer/tools.ts' __sfc__.render = ${compileCode} export default __sfc__ ` } export default function handleVUM ( const test = /\.vum$/ return { name, transform (code: string , id: string ) if (!test.test(id)) { return null } const name = basename(id, '.vum' ) const handleContent = transformVUM(code, name) return { code: handleContent, map: null , } }, } }
上面的插件内容非常简单,毕竟主要目标是为了验证.vum文件的编译是否符合预期,所以,它仅仅包含了一个name插件名称和transform转换逻辑
其中的主要流程是判断文件是否是一个.vum文件,如果是则调用transformVUM方法来编译文件的内容
而transformVUM方法,其本质也仅仅是匹配出.vum文件中的<script>和<template>标签的内容,并交由我们编写的template编译器和script编译器进行编译,然后将结果拼接为一个js代码字符串作为该文件的实际代码内容。
最终我们测试的.vum文件内容如下:
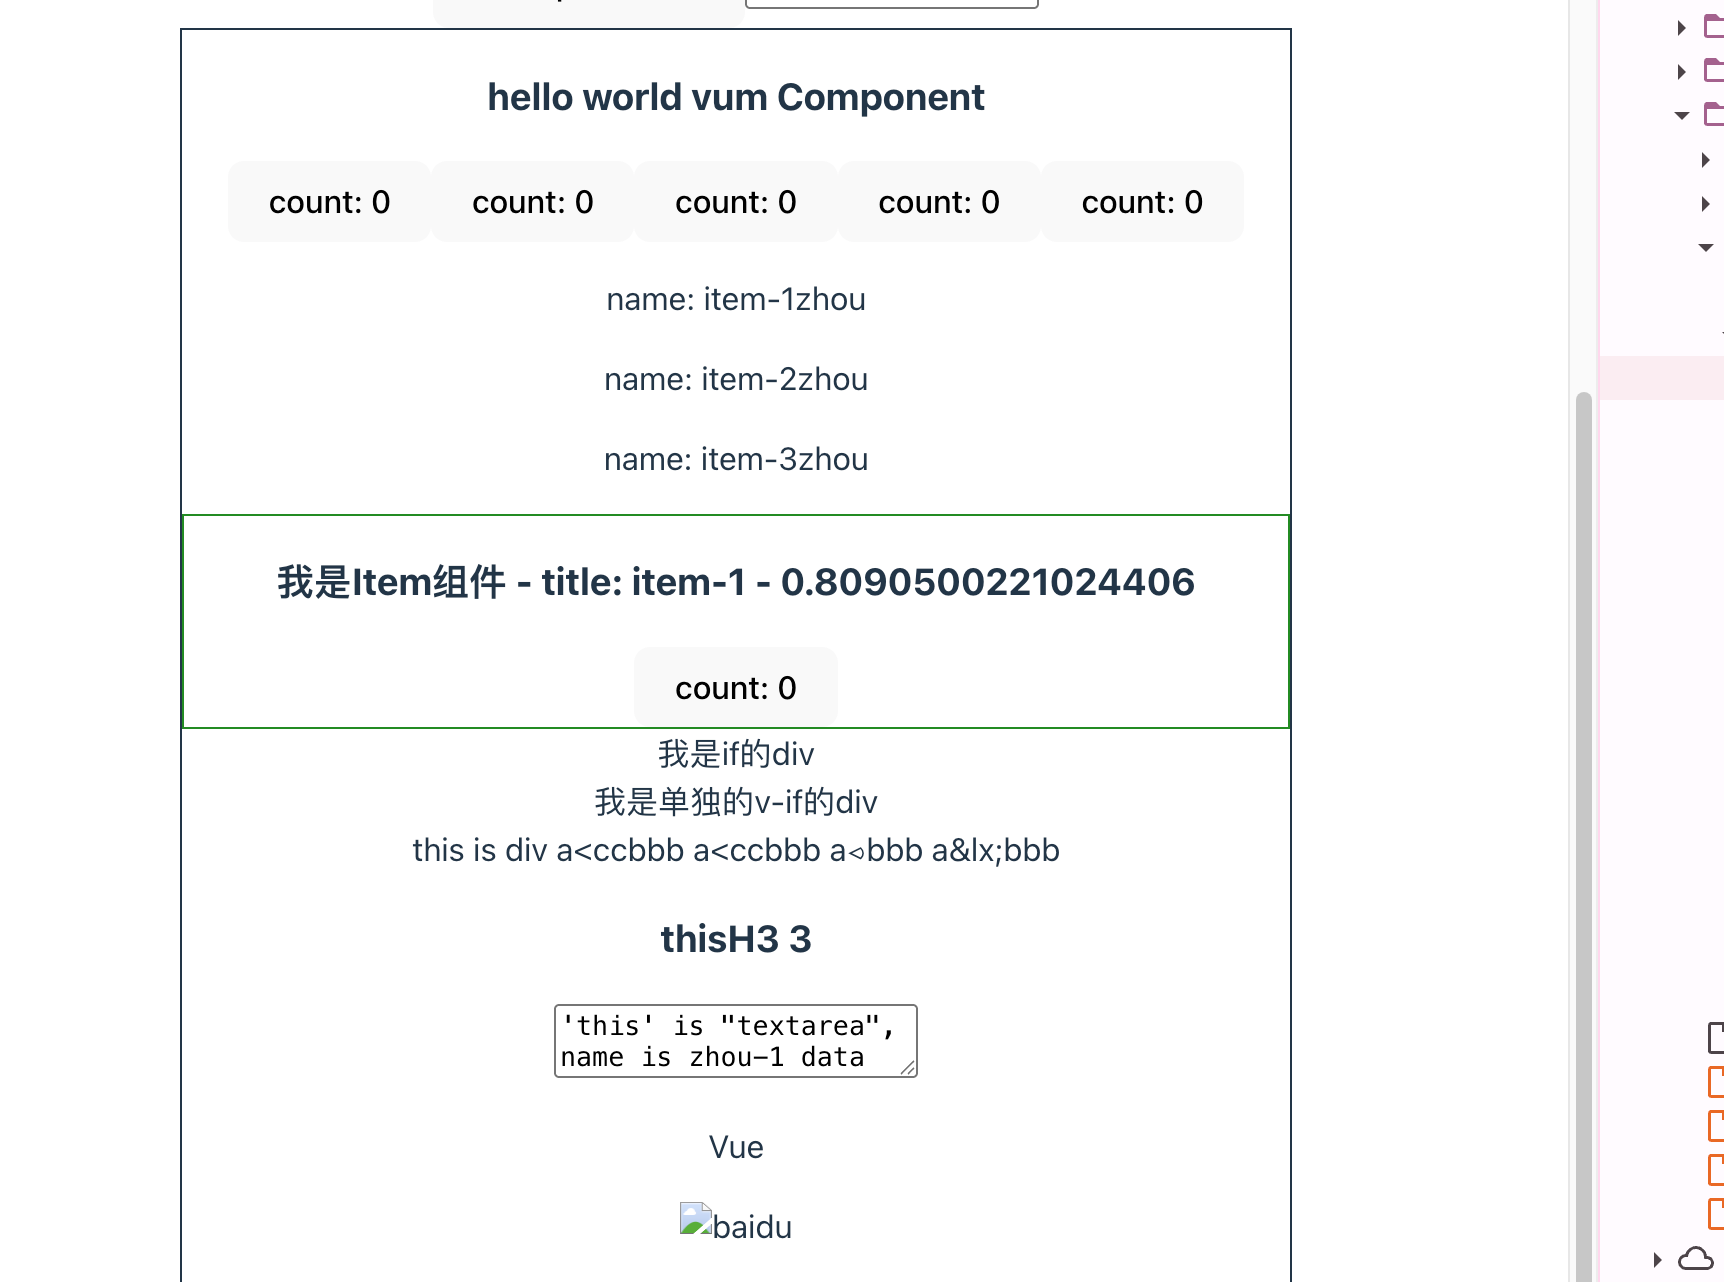
1
2
3
4
5
6
7
8
9
10
11
12
13
14
15
16
17
18
19
20
21
22
23
24
25
26
27
28
29
30
31
32
33
34
35
36
37
38
39
40
41
42
43
44
45
46
47
48
49
50
51
52
53
54
55
56
57
58
59
60
61
62
63
64
65
66
67
68
<script setup> import { ref } from '../responsiveObjects/responsive-object-6.ts' import { getCurrentInstance } from '../renderer/renderer-9.ts' // 子组件 import Item from './Item.vum' import Test from './Test.vum' import * as vueFrame from 'vue' import { ref as vueRef } from 'vue' const props = defineProps({ title: String }) const emit = defineEmits(['change']) const count = ref(0) const add = () => { console.log('add', count.value) count.value++ } function test() { console.log('test function') } const currentInstance = getCurrentInstance() console.log('currentInstance', currentInstance) const methods = { addCount: add, } let name = 'zhou' const list = ref([ { id: 1, name: 'item-1' }, { id: 2, name: 'item-2' }, { id: 3, name: 'item-3' }, ]) </script> <template> <div class="hello-world"> <h3>hello world vum Component</h3> <button @click="add">count: {{count}}</button> <button @click="methods.addCount">count: {{count}}</button> <button @click="add()">count: {{count}}</button> <button @click="count += 1">count: {{count}}</button> <button @click="() => { count += 1 console.log('箭头函数count', count) }">count: {{count}}</button> <div v-for="item in list" :key="item.id"> <p>name: {{item.name + name}}</p> </div> <Item title="item-1" @update="count += 1" /> <div v-if="count === 0">我是if的div</div> <div v-else-if="count === 1">我是else-if的div</div> <div v-else>我是else的div</div> <div v-if="count === 0">我是单独的v-if的div</div> <Test /> </div> </template>
页面渲染结果:
最终编译后的内容如下:
1
2
3
4
5
6
7
8
9
10
11
12
13
14
15
16
17
18
19
20
21
22
23
24
25
26
27
28
29
30
31
32
33
34
35
36
37
38
39
40
41
42
43
44
45
46
47
48
49
50
51
52
53
54
55
56
57
58
59
60
61
62
63
64
65
66
67
68
69
70
71
72
73
74
75
76
77
78
79
80
81
82
83
84
85
86
87
88
89
90
91
92
93
94
95
96
97
98
99
100
101
102
103
104
105
106
107
108
109
110
111
112
113
114
115
116
117
118
119
120
121
122
123
import { ref } from "/src/design/responsiveObjects/responsive-object-6.ts" import { getCurrentInstance } from "/src/design/renderer/renderer-9.ts" import Item from "/src/design/components/Item.vum?import" import Test from "/src/design/components/Test.vum?import" import * as vueFrame from "/node_modules/.vite/deps/vue.js?v=aee50b22" import { ref as vueRef } from "/node_modules/.vite/deps/vue.js?v=aee50b22" const __sfc__ = { _name: "HelloWorld" , setup: function ( __props, { emit: __emit } ) const props = __props const emit = __emit const count = ref(0 ) const add = () => { console .log('add' , count.value) count.value++ } function test ( console .log('test function' ) } const currentInstance = getCurrentInstance() console .log('currentInstance' , currentInstance) const methods = { addCount: add, } let name = 'zhou' const list = ref([ { id : 1 , name : 'item-1' }, { id : 2 , name : 'item-2' }, { id : 3 , name : 'item-3' }, ]) return { emit: emit, count: count, add: add, test: test, currentInstance: currentInstance, methods: methods, get name () { return name; }, set name (v ) { name = v; }, list: list, ref: ref, getCurrentInstance: getCurrentInstance, Item: Item, Test: Test, vueFrame: vueFrame, vueRef: vueRef }; }, props: { title: String }, emits: ['change' ] }; import { h, _toDisplayString, _createCommentVNode, _createTextVNode, _renderList } from "/src/design/renderer/tools.ts" __sfc__.render = function render (_ctx, _cache, $props, $setup ) return h('div' , { class: 'hello-world' }, [ h('h3' , 'hello world vum Component' ), h('button' , { onClick: _cache[0 ] || (_cache[0 ] = $setup.add) }, "count: " + _toDisplayString($setup.count)), h('button' , { onClick: _cache[1 ] || (_cache[1 ] = $setup.methods.addCount) }, "count: " + _toDisplayString($setup.count)), h('button' , { onClick: _cache[2 ] || (_cache[2 ] = () => $setup.add()) }, "count: " + _toDisplayString($setup.count)), h('button' , { onClick: _cache[3 ] || (_cache[3 ] = () => $setup.count += 1 ) }, "count: " + _toDisplayString($setup.count)), h('button' , { onClick: _cache[4 ] || (_cache[4 ] = () => { $setup.count += 1 console .log('箭头函数count' , $setup.count) }) }, "count: " + _toDisplayString($setup.count)), _renderList($setup.list, function (item ) return h('div' , { key: item.id }, [ h('p' , "name: " + _toDisplayString(item.name + $setup.name)) ]); }), h(Item, { title: 'item-1' , onUpdate: _cache[5 ] || (_cache[5 ] = () => $setup.count += 1 ) }, []), ($setup.count === 0 ) ? h('div' , {}, '我是if的div' ) : ($setup.count === 1 ) ? h('div' , {}, '我是else-if的div' ) : h('div' , {}, '我是else的div' ), ($setup.count === 0 ) ? h('div' , {}, '我是单独的v-if的div' ) : _createCommentVNode('v-if' ), h(Test, []) ]); } export default __sfc__
SFC中的script代码编译 大致的框架我们已经搭建下来了,那么我们就一步一步来完善我们的编译器,首先则是SFC中的script标签中的代码编译,这里面的代码是纯粹的js代码,我们知道,根据vue的SFC中定义,其script标签中的代码本质上会被编译为组件的setup函数,这里可不仅仅只需要将script标签中的js代码直接包装成一个setup函数就可以了,里面需要处理的细节还比较多,例如:
定义__sfc__模块对象作为默认导出,其__sfc__对象就是组件内容
定义setup函数
分离script代码中的import导入,将其从setup函数中移动到模块的顶层语句
支持defineProps和defineEmits宏解析和处理props和事件
收集setup定义的顶层变量和函数声明,他们需要作为setup函数的返回值
收集bindingMetadata,以便后续template模板编译时,其表达式的变量引用能够正确绑定$setup和$props上下文
js AST解析和转换 在处理script之前,我们需要先来大致了解一下如何解析和修改js代码,这里自然是基于js的抽象语法树(js AST)来处理了,js抽象语法树是js代码的结构化表达形式,通常用js对象这种树形结构表示,并且,js抽象语法树和js代码之间可以互相转换,这样我们就可以通过修改这个结构化对象来等同于修改js的代码。
这里我选用了recast来作为我的js抽象语法树解析库,它是在 Acorn(AST 解析)、Esprima 等基础上封装的上层友好库,核心优势是完全屏蔽 AST 底层细节、语法兼容无门槛、修改后源码格式还原度极高,不用手动处理 AST 节点创建 / 拼接 / 生成,是前端开发中轻量源码修改、脚本定制化改造的首选,比直接用 Babel 全家桶简单很多。它内置 ast-types 库,提供简洁的节点创建 / 查找 / 修改 API,完全满足了这个场景下的js代码转换需求(下文使用const b = recast.types.builders来创建AST节点)。
在当前这个场景下,recast轻量简单,能够满足需求,且配合在线的AST解析网站astexplorer ,最终结合AI的简单说明,完全能够满足当下对于js解析的需求了。而且也非常容易理解,对于js抽象语法树不太了解的人来说也能很快上手。
其核心流程仅仅只需要大致三个API:
1 2 3 4 5 6 7 8 9 10 11 12 13 14 const ast = recast.parse(sourceCode)recast.visit(ast, { visitImportDeclaration (path ) }, visitCallExpression (path ) }) const code = recast.print(ast).code
其对于js源码的所有操作都围绕上诉三个流程,我们整个后续的js代码处理都差不多按照上面的那个思路:找到需要处理的js源码所对应的AST节点,然后对其进行修改,最终将修改后的AST再转换为js源码字符串。
js AST结构化表示示例(简化):
1 2 3 4 5 6 7 8 9 10 11 12 13 14 15 16 17 18 19 20 21 22 23 24 25 { "type" : "Program" , "body" : [ { "type" : "VariableDeclaration" , "declarations" : [ { "type" : "VariableDeclarator" , "id" : { "type" : "Identifier" , "name" : "id" }, "init" : { "type" : "Literal" , "value" : 1 , "raw" : "1" } } ], "kind" : "const" } ], "sourceType" : "module" }
__sfc__对象 我们知道,一个SFC文件代表着一个组件,而一个组件其本质上的定义就是一个对象。我们通常把一个SFC文件视为一个es模块,其默认导出的就是组件对象,那么我们需要在这个es模块中创建一个__sfc__对象作为组件对象,并将该对象作为该模块的默认导出(默认导出在rollup插件那里定义)。其最终对应的就是:
1
2
3
4
const __sfc__ = { } export default __sfc__
创建__sfc__对象的代码:
1
2
3
4
5
6
7
8
9
10
const b = recast.types.buildersconst exportObjectProperties: recast.types.namedTypes.ObjectProperty[] = [ b.objectProperty(b.identifier('_name' ), b.literal(context.name)), b.objectProperty(b.identifier('setup' ), setupFn) ] const sfc = b.variableDeclaration('const' , [b.variableDeclarator(b.identifier('__sfc__' ), b.objectExpression(exportObjectProperties))])
在拥有了__sfc__对象后,我们还需要在这个对象上,完善组件所需要的选项属性,例如:
name属性:组件名称
setup:组件的setup函数
props:可能存在的组件props定义
emits:可能存在的组件事件定义
render:组件的渲染函数
下面我们来依次完善__sfc__对象的属性,例如setup函数、props等
setup函数 setup函数是组件的重点之一,几乎SFC的script标签中的所有代码都需要放在这个setup函数中,且setup函数最终会作为__sfc__对象的一个方法。
其本身setup函数定义非常简单,使用ast-types来创建一个函数表达式的AST节点即可:
1
2
3
const b = recast.types.buildersconst setupFn = b.functionExpression(null , setupParams, b.blockStatement(scriptAST.program.body as any), false , false )
这里的setupParams代表setup函数的参数声明,其大致逻辑如下:
1 2 3 4 5 6 7 8 9 10 11 12 13 14 15 16 17 18 const setupContextParamsPatternProperties: any[] = []const setupParams: any[] = [ b.identifier('__props' ), ] if (defineEmitsParams) { const emitProperty = b.objectProperty(b.identifier('emit' ), b.identifier('__emit' )) emitProperty.shorthand = true setupContextParamsPatternProperties.push(emitProperty) } if (setupContextParamsPatternProperties.length) { setupParams.push(b.objectPattern(setupContextParamsPatternProperties)) }
最终其转换后的setup函数参数为:
1
2
3
4
5
6
7
8
9
10
const __sfc__ = { setup: function ( __props, { emit: __emit } ) } }
而setup函数体的内容,我们需要先对其script标签中的js代码进行处理后,再将其作为作为整个setup的函数体内容,下文则会介绍script代码需要进行的一些处理。
import处理 我们先将整个script代码解析为ast:
1 const scriptAST = recast.parse(scriptContent)
我们知道script代码中可能存在improt导入,但是在将其转换为一个setup函数的函数体时,import语法无法出现在函数体中,所以我们需要先将scriptAST中的import语句都给提取出来,并从scriptAST删除,然后添加到整个模块的顶层语法中。
例如SFC的script代码如下:
1
2
3
4
<script> import tools from './tools.ts' const result = tools() </script>
转换后:
1
2
3
4
5
6
import tools from './tools.ts' const __sfc__ = { setup: function ( const result = tools() } }
这时候我们就需要利用到上文提到的recast.visit方法来对AST节点进行查找并处理了:
1 2 3 4 5 6 7 8 9 10 11 12 13 14 15 16 17 18 19 const importDeclaration: any[] = []const importIdentifiers: any[] = []recast.visit(scriptAST, { visitImportDeclaration(path): any { importDeclaration.push(path.value) path.value.specifiers.forEach((specifier: any ) => { importIdentifiers.push(specifier.local) }) path.prune() return false }, })
经过上面的节点查找和处理,我们成功的将scriptAST中的所有import语句从该AST中全部删除,同时用importDeclaration变量保存了这些import节点,后续只需要将importDeclaration中的节点添加到模块顶层的代码即可。
1 2 3 4 5 const program = b.program([ ...importDeclaration, sfc, ])
defineProps和defineEmits宏 我们知道,在SFC中的script标签中可以用defineProps和defineEmits宏来定义组件的props和emit事件,它们也明确说明了是一个编译时的宏,即defineProps和defineEmits仅在编译时对其进行处理,在运行时不会生效,这两个宏的语法表现就像是js的方法调用,这里的本质其实是在scriptAST中,找到这两个特殊的方法调用,并将其替换为__props变量和_emit变量:
1 2 3 4 5 6 7 8 9 10 11 12 13 14 15 16 17 18 19 20 21 22 23 let definePropsParams: anyrecast.visit(scriptAST, { visitCallExpression(path): any { if (path.value.callee.name === 'defineProps' ) { definePropsParams = path.value.arguments[0 ] path.replace(b.identifier('__props' )) } return false }, }) if (definePropsParams) { exportObjectProperties.push(b.objectProperty(b.identifier('props' ), definePropsParams)) }
其最终会转换为如下代码:以const props = defineProps({ title: String })为例
1
2
3
4
5
6
const __sfc__ = { setup: function (__props ) const props = __props }, props: { title : String } }
defineEmits宏也是类似的处理,这里不再赘述,且在vue3.5+时,defineProps宏可以支持props的解构,其大致思路应该是匹配所有defineProps结构出来的标识符,并为其添加一个props的前缀,不过此时就需要考虑解构时的默认值以及同名标识符的作用域问题了,会麻烦一些。
setup函数的返回值处理 我们知道,setup函数的返回值,会和template模板中表达式的变量名称进行匹配,例如setup函数返回了一个{ name }对象,那么template中的表达式例如{{ name }}中使用的name变量其实就是setup函数返回的对象中的name属性。
而在SFC中,template模板可以访问setup中定义的所有顶层变量和import导入的标识符,甚至template在编译后,能够区分这个变量是props上的还是script中定义的。那是如何做到的呢?这里的重点就在于setup函数的返回值和bindingMetadata的收集,bindingMetadata的收集我们下节在说明,先来处理setup函数的返回值。
我们知道在SFC中,script代码中不需要返回任何内容,但是setup函数在底层的处理中需要返回一个对象,那么template中才能够拿到相应的数据,这里就需要我们在编译时,找到所有scriptAST在顶层声明的变量和import导入的模块内容,并合并成一个对象,作为setup函数的返回值:
1
2
3
4
5
6
7
8
9
10
11
12
13
14
15
16
17
18
19
20
21
22
23
24
25
26
27
28
29
30
31
32
33
34
35
36
37
38
39
40
41
42
43
44
45
46
47
48
49
50
51
52
53
54
55
56
57
58
59
60
61
62
63
64
65
66
67
68
69
70
71
72
73
74
75
76
77
78
79
80
81
82
83
84
85
86
87
const importIdentifiers: any[] = []recast.visit(scriptAST, { visitImportDeclaration(path): any { path.value.specifiers.forEach((specifier: any ) => { importIdentifiers.push(specifier.local) }) }, }) const setupFnReturnObjectProperties: any[] = []recast.visit(setupFn, { visitFunctionDeclaration(path): any { Reflect .set(bindingMetadata, path.value.id.name, 'data' ) setupFnReturnObjectProperties.push( b.objectProperty( path.value.id, path.value.id, ) ) return false }, visitVariableDeclaration(path): any { if (path.value.kind === 'const' ) { path.value.declarations.forEach((declarator: any ) => { if (declarator.id.name !== 'props' ) { Reflect .set(bindingMetadata, declarator.id.name, 'data' ) setupFnReturnObjectProperties.push( b.objectProperty( declarator.id, declarator.id, ) ) } }) } if (path.value.kind === 'var' || path.value.kind === 'let' ) { path.value.declarations.forEach((declarator: any ) => { if (declarator.id.name !== 'props' ) { Reflect .set(bindingMetadata, declarator.id.name, 'data' ) setupFnReturnObjectProperties.push( b.objectMethod( 'get' , declarator.id, [], b.blockStatement([ b.returnStatement(declarator.id) ]), ) ) setupFnReturnObjectProperties.push( b.objectMethod( 'set' , declarator.id, [b.identifier('v' )], b.blockStatement([ b.expressionStatement(b.assignmentExpression('=' , declarator.id, b.identifier('v' ))), ]), ) ) } }) } return false } }) importIdentifiers.forEach((identifier: any ) => { Reflect .set(bindingMetadata, identifier.name, 'data' ) setupFnReturnObjectProperties.push( b.objectProperty( identifier, identifier, ) ) }) setupFn.body.body.push(b.returnStatement(b.objectExpression(setupFnReturnObjectProperties)))
最终其编译后的代码类似下面的形式:
1
2
3
4
5
6
7
8
9
10
11
12
13
14
15
16
17
18
19
20
21
22
23
const __sfc__ = { setup: function (__props ) return { count: count, add: add, get name () { return name; }, set name (v ) { name = v; }, ref: ref, Item: Item, Test: Test, vueFrame: vueFrame, vueRef: vueRef }; }, }
上一节我们提到,在SFC中,template模板可以访问setup中定义的所有顶层变量和import导入的标识符,甚至template在编译后,能够区分这个变量是props上的还是script中定义的。而其实现的核心就在于bindingMetadata对象的收集,它的主要目的就是找到script中所有的顶层标识符(例如import导入、变量声明、props定义)并且将其收集起来作为一个bindingMetadata对象,然后在后续的template编译节点,利用这个bindingMetadata对象信息,为所有表达式(指令中的表达式、文本插值中的表达式)添加合适的前缀,例如:{{name}}会被编译为:{{ $setup.name }}。
具体的template中表达式的编译我们下文再详细介绍,我们先来完成bindingMetadata的依赖收集过程,其bindingMetadata的数据结构非常简单,类似于:
1
2
3
4
5
const bindingMetadata = { name: 'data' , count: 'data' , title: 'props' , }
上面就是简化版的bindingMetadata,仅仅是一个对象,其key属性代表setup函数中可用的标识符,它可能是一个变量,也可能是一个import导入的模块内容,也可能是一个用defineProps宏定义的属性,而其value值则代表其来源,data代表setup中定义的标识符(后续会编译为$setup.xxx),props代表其是一个props属性(后续会编译为$props.xxx)
收集的过程也很简单,我们在上一节的setup函数的返回值处理过程中,其中存在一些类似于:Reflect.set(bindingMetadata, identifier.name, 'data')的代码就是收集bindingMetadata的过程。同时props的收集过程如下:
1 2 3 4 5 6 7 8 9 10 11 12 13 14 15 16 17 18 19 20 21 22 23 24 25 26 if (definePropsParams) { recast.visit(definePropsParams, { visitObjectExpression(path): any { path.value.properties.forEach((declarator: any ) => { Reflect .set(bindingMetadata, declarator.key.name, 'props' ) }) return false }, visitArrayExpression(path): any { path.value.elements.forEach((declarator: any ) => { if (declarator.type === 'Literal' ) { Reflect .set(bindingMetadata, declarator.value, 'props' ) } }) return false } }) }
输出完整的script编译后的代码字符串 在处理完上面的步骤后,我们最终会整合所有的内容,并利用recast来输出js源码字符串,至此完成了整个SFC的script部分的代码编译:
1 2 3 4 5 6 7 8 9 10 const program = b.program([ ...importDeclaration, sfc, ]) return { code: recast.print(program).code, bindingMetadata, }
SFC中的template编译 在上文中,我们完成了SFC中script标签的js代码编译,现在让我们来优化其template中的代码编译,在之前的vue.js设计与实现-编译器 文章中,我们已经实现了对于template中的编译过程,并最终得到了其render函数的js源码字符串。所以目前我们现在仅仅需要对其进行整合进SFC的编译流程以及对其进行完善以支持更多的功能。
之前我们实现的template编译器提供了compile方法,其返回一个render函数的字符串(完善后的编译结果),例如:
1 2 3 4 5 6 7 8 9 10 11 12 13 14 15 16 17 18 19 const template = `<div> <h3 size="16 + 1" @click="clickHandle">thisH3 {{ (1 + 2).toString() }}</h3> <!-- this is comment --> <p>Vue</p> </div>` function render (_ctx, _cache, $props, $setup ) return h('div' , [ h('h3' , { size: '16 + 1' , onClick: _cache[0 ] || (_cache[0 ] = $props.clickHandle) }, "thisH3 " + _toDisplayString( (1 + 2 ).toString() )), _createCommentVNode(' this is comment ' ), _createTextVNode(' ' ), h('p' , 'Vue' ) ]); }
并且在我们编写的rollup插件中,会将其render字符串作为__sfc__对象的render属性,以此来做到和SFC编译的整合:
1 2 3 4 5 6 7 8 9 10 11 12 const setupResult = compilerScript(scriptContent, compilerScriptContext)const compileCode = compile(templateContent, { bindingMetadata: setupResult.bindingMetadata, }) return ` ${setupResult.code} import { h, _toDisplayString, _createCommentVNode, _createTextVNode, _renderList } from '@/design/renderer/tools.ts' __sfc__.render = ${compileCode} export default __sfc__ `
所以我们仅仅需要关心compile编译器内部的优化即可。
template模板内的表达式变量处理 在上文编译script完成后,我们得到了一个bindingMetadata对象,他可以用来帮助我们在编译template的过程中,完成其表达式和setup中变量和props的关联,具体的实现其实也非常的简单,我们将template中所有的表达式内容,例如:v-bind指令、文本插值({{ name }})绑定的值都将其视为一个普通的js表达式语法,然后利用recast转换为AST并通过recast.visit来为其中的所有标识符都添加一个合适的前缀,而前缀的匹配逻辑就是基于bindingMetadata对象。
1
2
3
4
5
6
7
8
9
10
11
12
13
14
15
16
17
18
19
20
21
22
23
24
25
26
27
28
29
30
31
32
33
34
35
36
37
38
39
40
41
42
43
44
45
46
47
48
49
50
51
52
53
54
55
56
57
58
59
60
61
62
63
64
65
66
67
68
69
70
71
72
73
74
75
function hasScope (key: string, scope: string[][] ): boolean return scope.some((s ) => { return s.some(k => }) } const GLOBALS_ALLOWED = 'Infinity,undefined,NaN,isFinite,isNaN,parseFloat,parseInt,decodeURI,' + 'decodeURIComponent,encodeURI,encodeURIComponent,Math,Number,Date,Array,' + 'Object,Boolean,String,RegExp,Map,Set,JSON,Intl,BigInt,console,Error,Symbol' function isGloballyAllowed (key: string ): boolean const allowedGlobals = GLOBALS_ALLOWED.split(',' ) return allowedGlobals.includes(key) } export function templateExpression (expression: string, options: { bindingMetadata: any scope: string[][] } ): string const { bindingMetadata, scope } = options const expressionAST = recast.parse(expression) const b = recast.types.builders recast.visit(expressionAST, { visitIdentifier(path): any { const identifierNode = path.node; const identifierName = identifierNode.name; const parentNode = path.parent.node; const types = recast.types.namedTypes; const isMemberProp = ( types.MemberExpression.check(parentNode) && parentNode.property === identifierNode && parentNode.computed === false ); if (isMemberProp) { return this .traverse(path) } if (path.value.name in bindingMetadata) { const type = bindingMetadata[path.value.name] if (type === 'data' ) { path.replace(b.memberExpression(b.identifier('$setup' ), path.value, false )) } else if (type === 'props' ) { path.replace(b.memberExpression(b.identifier('$props' ), path.value, false )) } } else if (!hasScope(path.value.name, scope) && !isGloballyAllowed(path.value.name)) { path.replace(b.memberExpression(b.identifier('_ctx' ), path.value, false )) } return false } }) return recast.print(expressionAST).code }
以<Component v-bind:key="num + 1" />为例,我们最终解析出来的模板AST中会将整个num + 1视为一个表达式
其中key是一个动态绑定,其整个num + 1都是一个表达式,那么利用recast.parse将该表达式转换为一个AST之后,我们再通过visitIdentifier的节点查找找到该表达式中的所有标识符,这里的标识符是name
找到标识符后,在去匹配bindingMetadata中是否存在同名的key,如果存在,则根据其值是data或者props来确定其添加的前缀是什么
如果是data,则最终会被替换为:$setup.num + 1
如果是props,则最终会被替换为:$props.num + 1
其他注意事项
我们通过isGloballyAllowed来判断该标识符是否是一个有限的全局变量,如果是全局变量,则不需要添加前缀
isMemberProp用来排除成员访问节点data.name中name的匹配,并跳过该前缀的添加
hasScope用来判断v-for指令中(item, index) in xxx表达式的作用域变量,例如在一个v-for指令中,表达式访问的是v-bind:key="index",此时也不应为index添加$setup等前缀
最终如果都没有匹配到,则为其添加_ctx作为前缀的保底
事件绑定,具有特殊性,所以在其他地方额外处理
template模板内的事件绑定处理 我们知道,vue的事件绑定可以支持表达式和匿名函数,而表达式本身也可以是一个属性访问符或者标识符。那么我们就需要根据事件绑定的内容来进行区分:
1 2 3 4 5 6 7 8 9 10 11 12 13 14 15 16 17 18 19 20 21 22 23 24 25 26 27 28 29 30 31 32 33 34 35 36 37 38 39 40 41 42 43 44 45 46 47 48 49 50 51 52 53 54 55 56 57 58 59 60 export function templateEventHandler (expressionStr: string, bindingMetadata: any, cacheIndex: number ): isMethodExpression: boolean code: any } { let expressionAST = recast.parse(expressionStr) const b = recast.types.builders let isMethodExpression = false if (expressionAST.program.body[0 ].type === 'ExpressionStatement' ) { const expression = expressionAST.program.body[0 ].expression if (expression.type !== 'ArrowFunctionExpression' && expression.type !== 'Identifier' && expression.type !== 'MemberExpression' ) { expressionAST = recast.parse(`() => ${expressionStr} ` ) } if (expression.type !== 'Identifier' || expression.type !== 'MemberExpression' ) { isMethodExpression = true } } recast.visit(expressionAST, { visitIdentifier(path): any { if (path.value.name in bindingMetadata) { const type = bindingMetadata[path.value.name] if (type === 'data' ) { path.replace(b.memberExpression(b.identifier('$setup' ), path.value, false )) } else if (type === 'props' ) { path.replace(b.memberExpression(b.identifier('$props' ), path.value, false )) } } return false } }) return { isMethodExpression, code: `_cache[${cacheIndex} ] || (_cache[${cacheIndex} ] = ${recast.print(expressionAST).code} )` , } }
上面的代码就是专门处理模板中的事件绑定的,其流程和普通的表达式处理类似
主要是先判断事件绑定的内容是否是一个表达式,如果是的话,则将其包装到一个箭头函数表达式中去
然后再解析整个表达式中的标识符,为其添加合适的前缀
最后再将整个表达式合并到_cache的缓存优化语句中去
待优化
编译示例:
1 2 3 4 5 6 7 8 9 10 11 12 13 14 15 16 17 18 19 20 21 22 23 24 25 26 27 28 29 30 31 32 33 const tmeplate = ` <button @click="add">count: {{count}}</button> <button @click="methods.addCount">count: {{count}}</button> <button @click="add()">count: {{count}}</button> <button @click="count += 1">count: {{count}}</button> <button @click="() => { count += 1 console.log('箭头函数count', count) }">count: {{count}}</button> ` [ h('button' , { onClick: _cache[0 ] || (_cache[0 ] = $setup.add) }, "count: " + _toDisplayString($setup.count)), h('button' , { onClick: _cache[1 ] || (_cache[1 ] = $setup.methods.addCount) }, "count: " + _toDisplayString($setup.count)), h('button' , { onClick: _cache[2 ] || (_cache[2 ] = () => $setup.add()) }, "count: " + _toDisplayString($setup.count)), h('button' , { onClick: _cache[3 ] || (_cache[3 ] = () => $setup.count += 1 ) }, "count: " + _toDisplayString($setup.count)), h('button' , { onClick: _cache[4 ] || (_cache[4 ] = () => { $setup.count += 1 console .log('箭头函数count' , $setup.count) }) }, "count: " + _toDisplayString($setup.count)) ]
v-if的实现 vue中的v-if指令本质上是一个编译时指令,它和其他运行时指令不一样,其他的运行时指令会编译为特殊的语法(作为h函数的最后一个参数),而v-if指令则会在编译阶段就会将其转换为一个三元运算符的表达式。为此我们需要扩展一下我们的模板AST的结构,用来标记该节点是否存在v-if或者v-else等指令
1
2
3
4
5
6
7
8
9
10
11
type TemplateASTNode = { type : 'Root' | 'Element' | 'Text' | 'Interpolation' | 'Comment' ifNode?: boolean elseNode?: boolean elseIfNode?: boolean ifExpressions?: string }
然后,我们还需要让整个的模板编译器的js AST支持三元运算符(因为模板编译器的js AST结构是自定义的):
1 2 3 4 5 6 7 8 9 type ConditionalExpression = { type: 'ConditionalExpression' expression: any left: any right: any }
那么我们在transform转换器阶段,就可以利用其插件化架构,标记其节点是否为v-if节点,并在添加一个额外的mergeIfNode转换函数,按照合适的顺序来处理这些v-if节点了。
和其关联的转换器插件主要有三个部分:
1
2
3
4
5
6
7
8
const context = { nodeTransforms: [ transformElementNodeProps, transformElementNodeToJsAST, mergeIfNode, ] }
transformElementNodeProps:最先执行,解析节点的props,并标记其节点的v-if信息,它在节点进入时进行处理
mergeIfNode:其次执行,合并每一层节点的v-if、v-else、v-else-if节点,它在节点离开时执行
transformElementNodeToJsAST:最后执行,转换模板AST节点为js AST,它在节点离开时执行,且由于处理函数的顺序在mergeIfNode之前,所以它反而最后才处理执行。
这里说明一下mergeIfNode处理函数,它的作用其实就是遍历整个节点,以存在v-if指令的节点开始,合并其相邻的v-else或者v-else-if节点,最终将其相关的节点转换为一个可嵌套的三元表达式js AST,然后在transformElementNodeToJsAST合并子节点的js AST时,过滤掉v-else或者v-else-if节点的js AST,仅保留v-if节点所在的js AST
1 2 3 4 5 6 7 8 9 10 11 12 13 14 15 16 17 18 19 20 21 22 23 24 25 26 27 28 29 30 31 32 33 34 35 36 37 38 39 40 41 42 43 44 45 46 47 48 49 50 51 52 53 54 55 56 57 58 59 60 61 62 63 64 65 function mergeIfNode (astNode: TemplateASTNode, context: TemplateASTContext ) function dfs (index: number ): any const node = astNode.children![index] if (node) { if (node.elseIfNode) { return createConditionalExpression( createExpression(templateExpression(node.ifExpressions!, { bindingMetadata: context.bindingMetadata, scope: context.scope, })), node.jsNode!, dfs(index + 1 ), ) } else if (node.elseNode) { return node.jsNode! } } return createCallExpression({ type: 'Identifier' , name: '_createCommentVNode' , }, [ createStringLiteral('v-if' ) ]) } if (astNode.type === 'Element' ) { return function ( if (astNode.children) { let i = 0 while (i < astNode.children.length) { let node = astNode.children[i] if (node?.ifNode) { node.jsNode = createConditionalExpression( createExpression(templateExpression(node.ifExpressions!, { bindingMetadata: context.bindingMetadata, scope: context.scope, })), node.jsNode!, dfs(i + 1 ), ) } i++ } } } } }
最终会转换成如下的js字符串:
1 2 3 4 5 6 7 8 const template = ` <div v-if="count === 0">我是if的div</div> <div v-else-if="count === 1">我是else-if的div</div> <div v-else>我是else的div</div> ` ($setup.count === 0 ) ? h('div' , {}, '我是if的div' ) : ($setup.count === 1 ) ? h('div' , {}, '我是else-if的div' ) : h('div' , {}, '我是else的div' )
v-for的实现 v-for和v-if类似,也是一个编译时的指令,它的本质其实是将v-for指令所在的节点,包装为一个_renderList的函数调用,其大致处理如下:
1 2 3 4 5 6 7 8 9 10 11 12 13 14 15 16 17 18 19 20 21 22 23 24 25 26 27 28 29 30 31 32 33 34 35 36 37 38 39 40 41 42 43 44 45 46 47 48 49 50 51 52 53 54 55 56 57 58 59 60 61 62 63 export function templateForExpression (expression: string ): parameters: string[] source: string } { const [data, source] = expression.split(' in ' ) if (!data || !source) { throw new Error ('v-for指令解析失败,无法匹配数据源和迭代变量' ) } let dataFnExpression = `${data.trim()} => {}` const dataFnAST = recast.parse(dataFnExpression) const parameters: string[] = [] recast.visit(dataFnAST, { visitIdentifier(path): any { parameters.push(path.value.name) return false } }) return { parameters, source, } } const { source, parameters } = templateForExpression(forDirective.value)astNode.jsNode = createCallExpression(createIdentifier('_renderList' ), [ createExpression(templateExpression(source, { bindingMetadata: context.bindingMetadata, scope: context.scope, })), { type: 'FunctionDecl' , id: createIdentifier('' ), arrowFunction: true , params: [ ...parameters.map(v => ], body: [ { type: 'ReturnStatement' , return : createCallExpression(createIdentifier('h' ), callExpressionArgs), } ], }, ])
转换后的js代码示例:
1
2
3
4
5
6
7
8
9
10
11
12
13
14
15
const template = ` <div v-for="item in list" :key="item.id"> <p>name: {{item.name + name}}</p> </div> ` _renderList($setup.list, function (item ) return h('div' , { key: item.id }, [ h('p' , "name: " + _toDisplayString(item.name + $setup.name)) ]); })
这里需要注意,在v-for中类似的(item, index) in data表达式需要先被解析,以得到其data、item、index这些标识符,这在后续的js AST生成中需要用到。
以(item, index) in data为例,在解析的过程中,还需要绑定当前节点的作用域,因为在v-for节点中,其子节点是可以访问item和index,其实现的方式类似于js中的作用域链,我们在转换器的处理函数中,添加一个transformBindForDirectiveScope处理函数,用来在解析到一个v-for节点时,将其定义的变量(这里是item和index)添加到转换器上下文中的scope中,这个scope是一个二维数组,其模拟了js变量查找时的作用域链,在templateExpression方法中为表达式添加前缀时,如果该标识符能够匹配到scope作用域中的变量名,那么就不会为其添加$setup等前缀了。
1 2 3 4 5 6 7 8 9 10 11 12 13 14 15 16 17 18 19 20 21 22 23 24 25 26 function transformBindForDirectiveScope (astNode: TemplateASTNode, context: TemplateASTContext ) if (astNode.type === 'Element' && astNode.normalizationProps?.length) { const normalizationProps: NormalizationProps[] = astNode.normalizationProps const variables: string[] = [] normalizationProps.filter(v =>'Directive' && v.name === 'for' ).map((forDirective ) => { const { parameters } = templateForExpression(forDirective.value) variables.push(...parameters) }) context.addScopeVariables(variables) return () => { context.removeScopeVariables() } } }
结语 至此,vue3的学习之旅暂时搞一段落了,最终的成果,则是能够在一个vite创建的vue项目中,用自己编写的响应式系统、渲染器和编译器,去编译一个自定义的SFC组件,并能够正常的渲染到页面中,且能够如同vue一样,实现组件拆分和响应式更新以及业务逻辑。
回顾整个的学习过程,首先最明显的感觉就是在编写vue代码时有底气多了,很多东西之前写起来感觉会有一种知其然而不知其所以然的滞涩感,很多时候代码写下去心里可能有一丝没有底的感觉,可能比较淡但是确实会存在。其原因可能在于你编写的东西如果没有完全理解时,会天然的产生一种如果出现问题或者不符合自身预期时,面对未知时的恐慌感,你不确定自己是否能够快速的去解决这个问题。而经过了这一段时间的学习,让我有信心在面对大部分vue问题时,能够较为有底气的去解决它,即使是一个未知的问题,至少我能够存在一个大致的方向和思路去尝试验证。我感觉我达到了在我一开始学习vue相关知识时的目的。人在学习到了新的知识,解开自身的疑惑时,确实能让人感到愉悦。